Learning FileMaker Pro 10
by Greg Bowden (492 pages)
The tutorials have been developed for FileMaker Pro 10 on the Windows or Macintosh systems as single or multi-user versions. The files can be printed or followed onscreen next to the application. Assignments are provided at the end of each chapter. The multi-user version has a detailed project at the end of Module 1 so that students can practice the skills that they have learned within that module.
 |
Module 1 introduces the FileMaker Pro 10 basics including finding and sorting data, creating a database, Standard Form layouts, Columnar Report layouts, creating data-entry screens, using the Drawing Tools, using pop-up menus, radio buttons and drop-down menus, using buttons, using the Tab Control tool to produce tabbed interfaces, data searching techniques and using calculation fields. |
Prices (Including GST)
Products can be purchased using a School Purchase Order Number, Credit Card or PayPal.
Learning FileMaker Pro 10 Module 1 Single-user, $A11 |
|
Learning FileMaker Pro 10 Module 2 Single-user, $A11 |
|
Learning FileMaker Pro 10 Module 1 Multi-user, $A132 |
|
Learning FileMaker Pro 10 Module 2 Multi-user, $A132 |
- Chapters and Sample Pages
- Chapter Descriptions
Module 1 FileMaker Pro 10 Basics
Contents (Modules 1 & 2) |
view pages (126k) |
Chapter 1: Introduction to Databases (19 pages) |
view sample pages (478k) |
Chapter 2: Creating a Database (20 pages) |
view sample pages (718k) |
Chapter 3: Standard Form Layouts (15 pages) |
|
Chapter 4: Columnar Report Layouts (16 pages) |
view sample pages (596k) |
Chapter 5: Creating Data Entry Screens (29 pages) |
|
Chapter 6: Formatting Layouts (22 pages) |
view sample pages (640k) |
Chapter 7: Using Buttons (23 pages) |
|
Chapter 8: Tabbed Interfaces (18 pages) |
view sample pages (775k) |
Chapter 9: Data Searching Tools (18 pages) |
view sample pages (587k) |
Chapter 10: Calculation Fields (18 pages) |
view sample pages (700k) |
Project 1 Multi-user only (3 pages) |
|
Module 2 FileMaker Pro 10 Advanced Exercises
Chapter 11: Creating Scripts (32 pages) |
view sample pages (682k) |
Chapter 12: Totalling Items (12 pages) |
|
Chapter 13: Displaying Sub-Totals (20 pages) |
view sample pages (635k) |
Chapter 14: Looking Up Data From Interanl Files (32 pages) |
|
Chapter 15: Looking Up Data From External Files (20 pages) |
view sample pages (522k) |
Chapter 16: Relational Databases (20 pages) |
view sample pages (445k) |
Chapter 17: Portals (25 pages) |
view sample pages (795k) |
Chapter 18: Sales Invoice Systems (48 pages) |
view sample pages (637k) |
Chapter 19: Reporting on Invoice Systems (24 pages) |
view sample pages (655k) |
Chapter 20: Useful Features (28 pages) |
|
Module 1 Chapter Descriptions
Chapter 1: Introduction to Databases
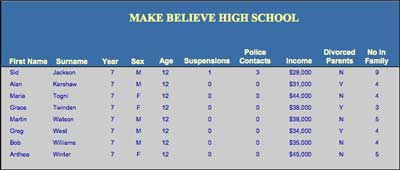
Introduces students to the value of a database by searching and sorting data to find information about students of a mythical school. Searches are carried out on numeric, text and multiple fields. The following prepared database is used:
Chapter 2: Creating a Database
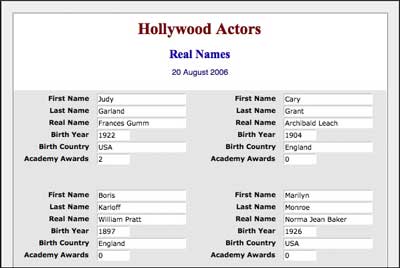
Students are shown how to create a database about actors from scratch. This includes entering text and number fields, entering records, editing records, the different screen views available, formatting fields and printing the data. The following printout is created.

Chapter 3: Standard Form
Layout Students are shown how to display data using the Standard Form Layout. This includes selecting the fields to be included in the layout and the layout theme. The layout is formatted into columns, the size of the Body part adjusted, Header text inserted and formatted, and a page number inserted in the Footer part. The following layout is produced:
Chapter 4: Columnar Report Layouts
Students are shown how to create a columnar report. This includes selecting the fields and layout theme, sorting the data, adjusting the field widths in the layout, formatting the fields and field labels, adding a header and inserting a footer. The following layout is created:

Chapter
5: Creating a Data Entry Screen
Students are shown how to create a data entry screen from a blank layout. The field tool is used to insert fields onto the layout. The layout tools including the Graphics and Text Rulers, Page Margins, Ruler Lines, T-Squares and the Object Size Box are used to assist with the creation of the layout. The fields are then aligned, formatted and field borders turned on. The following layout is created:

Chapter 6: Formatting Layouts
In this chapter students format the data entry screen created in the previous chapter. This includes using the Drawing Tools to add shadings and effects to the layout, inserting images, formatting the fields with pop-up menus, radio buttons, drop-down calendars, and formatting field behaviours. The following data entry screen is produced.

Chapter 7: Using Buttons
Students are shown how to insert buttons to change the screen to a different layout or to run commands. Prepared graphics are used as buttons along with the Button Tool. Buttons are copied from one layout to another and set not to print. The following diagram shows the buttons that are added to a prepared data entry screen.

Chapter 8: Tabbed Interfaces
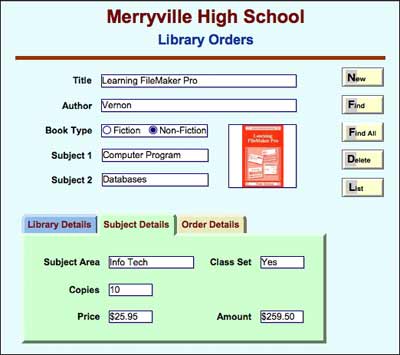
Students are shown how to use the Tab Control tool to add a tabbed interface to the data entry screen used in the previous chapter. Fields are added to each tab region and formatted using the Format Painter tool. The tab control is then formatted using the Drawing Tools. The following layout is created:
Chapter 9: Data Searching Tools
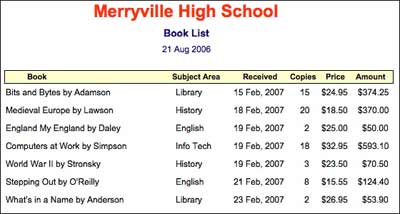
Students are shown how to do advanced searches on a database, This includes AND and OR searches, omitting records, finding blank entries, using range searches on numbers and dates, using wildcard characters, finding duplicate records and saving searches. For example, the book acquisitions for a month are displayed:

Chapter 10: Calculation Fields
Students are shown how to do mathematical calculations on number fields, how to combine text fields together and how to do age calculations. For example, the following layout combines the Title and Author fields:
Project
1
The Multi-user version
provides a detailed projects for managing the rental properties
for a real estate agency. All the data for the
projects is provided.
Module 2 Chapter Descriptions
Chapter 11: Creating Scripts
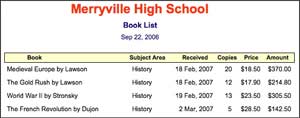
Introduces students to the creation of scripts. Script commands covered include Enter Browse Mode, Go to Layout, Sort Records, Perform Find, Print Setup and Print. Students are shown how to set buttons to run scripts, duplicate scripts, edit scripts and print the script commands. The following printout is the result of one of the scripts:
Chapter 12: Totalling Items
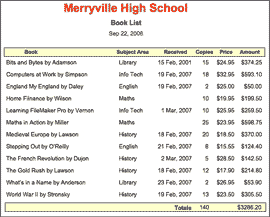
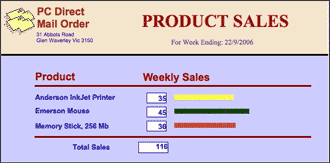
Students are shown how to produce totals on number fields. The use of Summary Fields and the Trailing Grand Summary Part are introduced. The following layout is created:
Chapter 13: Displaying Sub-Totals
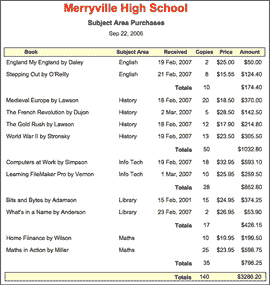
Students are shown how to create sub-totals on grouped data. This includes inserting Sub-Summary parts, duplicating Summary fields, sorting the data into the required order, duplicating layouts, editing Sub-Summary parts and creating scripts to automatically produce the required sub-totals. The following is one of the reports that is created:
Chapter 14: Looking Up Data From External Files
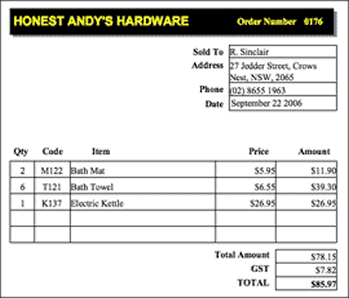
This chapter provides activities on how to lookup data from an external support file and insert that data into a parent file. The concepts of a relational database system introduced along with the use of looked-up fields, repeating fields and setting value lists. The following invoice is created where data is looked up from a stock list.
Chapter
15: Looking Up Data From Internal Files
Students are shown how to use multiple tables within the one database. Relationships between the tables are set and data looked up from internal tables. The invoice from the previous chapter is modified to look up data from an internal Customers table:

Chapter 16: Relational Databases
This chapter extends the use of relational database systems. It covers defining relationships, setting the different options available when relating files to one another and the advantages of relational database systems. The following layout is created which displays data from a Products table in a Departments layout:

Chapter 17: Portals
The Departments layout from the previous chapter is modified to display data from the Products table in a Portal frame, which allows multiple records to be displayed. It covers creating the Portal, setting the Portal's size, formatting the Portal, editing the Portal and using the Portal.

Chapter 18: Sales Invoice Systems
This chapter provides activities that apply the relational database concepts developed in the previous 2 chapters to create a complete sales invoice system. It covers creating the relationships, preparing the invoice, completing calculations, popup lists, adding buttons and using the invoice. The following invoice is created:

Chapter 19: Reporting on Invoice Systems
Reports are created on the sales data produced from the Sales Invoice system developed in the previous chapter. One report shows the sales totals of each item that the company sells. A second report displays the monthly sales figures.

Chapter 20: Useful Features
This chapter demonstrates some of the useful tools that FileMaker Pro provides. For example, importing data from other sources, creating mailing labels, setting passwords, accounts and access privileges, and charting data.
| Home | Products | iPad | Downloads | Testimonials | Ordering | Contact Us |